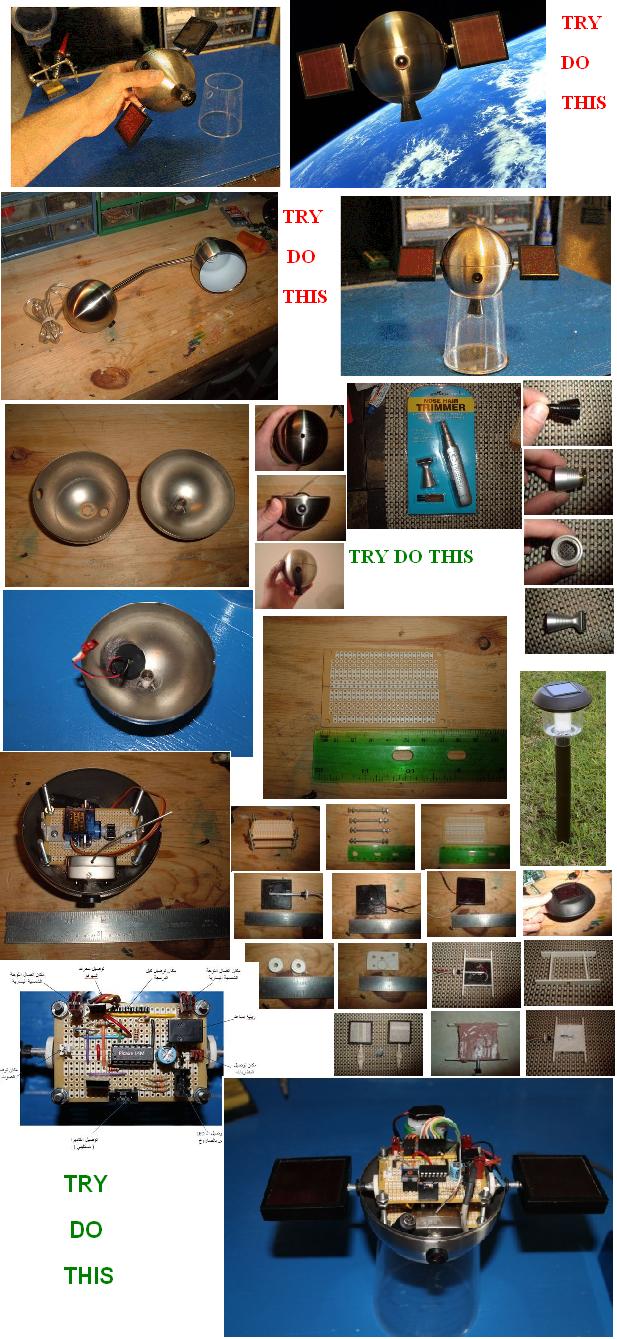
How to make a simple satellite in your home
The benefits of small satellite in your home where you can put
surveillance cameras to your home to over 300 feet - and put solar
panels could power the same charge from the sun directly
Tools used
Cover external and can be accessed from an old lamp or an old lampshades and please make small holes to put cameras
Making maketh shuttle launch, which will be given at the lighting of
the satellite and can work in this case to use any cream tube cover as
shown pictures
And Cut the top piece so that it becomes similar to the shuttle
And this piece is installed in the lower segment of the lamp
Then cut a piece of electronic painting in a circular motion as images
so that they are suitable to be placed inside the upper segment
And it is connected to the valve of the radiant light of the
electronic panel while leaving enough length of wire connected to the
valve in order to be connected to electrical circuit later
And the electronic panel is installed on top of the shuttle, and the shuttle is installed freelancer bottom of the lamp
Then, after the addition of a small speaker sound from an old radio is
installed, for example, the upper section of the piece Filah lamp as
pictures
Then comes the role of solar cells
We will need to structure of sorts, picking up electrical circuits and solar panels. So I found the best way to arrange that I put electronic paintings in layers, as in the pictures, which are cheap and easy process and do not require a lot of time, as it allows you to easily re-Qmrk industrial maintenance. Previous pictures show two views in the work of the temple pregnant
I used 4 rechargeable batteries with a capacity of 2000 Nimh (with the exception of the battery 9 volts used for the camera). In order for these batteries remain always charged, you use Hmsien two sheets of solar panels that are used in lighting gardens lamps, have you remove the solar panels of bulbs, then you making a template to give them appropriate and clean shape, then hide extra-passing wire through the hollow tube
The
solar panels will need to move them based mechanism, in order to be
able to track the movement of the sun, this mechanism we can get through
4 pads shaped L, and servo motor Servo microsatellite, and the gears of
the type Salvaged. These tools can get a unit or recycling of solar panels based system to track the movement of the sun.
I
am making cushions of aluminum panels flat width of 2 cm, and then you
crop them in the middle, and then discourage them from binding or by
pliers, and open holes in one of the two parties in order to pass the
solar panel tube and the other in order to install the electronic
Missned painting. The Almsndin who use them to install the servo drive has had to reduce
the display in order to be able to install the engine, and by way of
supporting your installation, you may need other incisions to pass
certain wires, can not do that but on the condition that does not affect
the design.
By gum and adhesives can you install together, and the use of adhesives here to be able to jaw if required
Take the dentate who come by the servo motor and install it, and then collects the full pieces as shown in the attached forms
The
camera installation was the easiest part of the design, have you
purchased a wireless camera (the price does not exceed $ 30, or about
Moroccan dirhams 254, and 192 pounds, and 112 SAR), and simply you unzip
the lens, then you have entered allocated to it in the exoskeleton and
then you Petrkbhe time of hole Others
inside the camera, and then set the camera structure through the
thermal adhesive, and was keen to be with adhesive thermal installation
to be able to remove them if necessary, then you have installed the
battery with 9 volts through the same process. The operation of the camera (Vs 2.0) will be either temporary by time or by remote
In order to be able to re-programming of the system, and found that
the user socket for the installation of a computer mouse is very
appropriate, since it enough pins to do the work, and cut the cable into
two halves gave me two ends (male and female) wires ready for welding
process
And
now we'll come to the most difficult part of the process, which is the
brain, where you see in the picture number of vehicle electronic parts,
all of these electronic parts you get them from the Consumer Electronics
old. It is difficult to explain how to put each piece its place, but I used
the wizard Picaxe 14M to represent the role of the mind in the system,
and the images attached to explain a little bit, in addition to the
decree in the following picture outline will help you a lot on the
installation of the pieces, and to outline read well in addition to the
programming picaxe processor
You
may wonder what will happen inside the machine after all this work, so
let me explain to you, when energy enters the system is first checks the
voltage input which comes from solar panels, if the low-voltage, the
device becomes a dormant state, and if the high wakes up (works ), and when he wakes up the sound issued by the speaker, as the
irradiated light LED lighting like a rocket, so the machine looks like a
natural satellite.
After
that the solar panels scans 5 spots in the sky, and measure the voltage
in each scan, and when the end of the scanning process compares spots,
and choose the spot with a voltage higher, spin panels again to prove to
the direction of the spot with a rated voltage up and become in a coma
for a short period of time to save energy, and after you wake up is examining its voltage
core and start the same process again, and if the voltage is too low
issue a voice over the loudspeaker, and then go dormant
All you would be doing now is to assemble the pieces in full, as in group photos. For
my design I was able to cut the entire installation within the
exoskeleton, then left two holes in order to pass the tablets tubular
Achammsin. Then
I was able to move the tables computer professionals up and down,
because I used screws screwed from both sides, and this was a good idea
for the dimension between the electronic control panels
كيفية صنع قمر صناعى بسيط فى بيتك
فوائد القمر الصناعى الصغير فى بيتك حيث يمكنك وضع كاميرات مراقبة لمنزلك لمدى 300 قدم - و بوضع لوحات طاقة شمسية يمكنه شحن نفسه من الشمس مباشرة
الادوات المستخدمة
غطاء خارجى و يمكن الحصول عليه من مصباح قديم او اباجورة قديمة و يرجى صنع ثقوب صغيرة لوضع الكاميرات
صنع ماكيث مكوك الاطلاق الذى سوف يعطى اضائة عند عمل القمر الصناعى و يمكن فى هذه الحالة استخدام غطاء لانبوب اى كريم كما هو موضح بالصور
و قم بقص القطعة العلوية بحيث تصبح مشابهه للمكوك
و يتم تثبيت هذه القطعة فى القطعة السفلية من المصباح
ثم يتم قص قطعة اللوحة الالكترونية بشكل دائرى كما بالصور بحيث تكون مناسبة لكى توضع داخل القطعة العلوية
و يتم توصيل صمام مشع للضوء باللوحة الالكترونية مع ترك طول كاف من السلك الموصول بالصمام كى يتم توصيله بالدائرة الكهربائية فيما بعد
و يتم تثبيت اللوحة الالكترونية بالجزء العلوى للمكوك ثم يتم تثبيت المكوك بالقطعة السفلية للمصباح
ثم بعد ذلك اضافة مكبر صوت صغير من راديو قديم مثلا يتم تثبيته بالقسم العلوى من القطعة الفلية للمصباح كما بالصور
ثم بعد ذلك يأتى دور الخلايا الشمسية
سنحتاج إلى هيكل من نوع ما، ليقوم بحمل الدارات الكهربائية واللوحات الشمسية. لذلك وجدت أفضل طريقة للترتيب أن أقوم بوضع اللوحات الإلكترونية بشكل طبقات، كما في الصور، وهي عملية سهلة ورخيصة ولا تحتاج الكثير من الوقت، كما أنها تتيح لك بسهولة إعادة صيانة قمرك الصناعي. والصور السابقة توضح طريقتي في عمل الهيكل الحامل
لقد قمت باستخدام 4 بطاريات قابلة للشحن بسعة 2000Nimh (باستثناء البطارية ذات ال 9 فولط المستخدمة من أجل الكاميرا). ولكي تبقى هذه البطاريات مشحونة دائما، قمت باستعمال لوحين شمسيين من الألواح الشمسية التي تستعمل في إنارة مصابيح الحدائق، فقد قمت بإزالة الألواح الشمسية من المصابيح، ثم قمت بصنع قالب لإعطائهم الشكل المناسب والنظيف، ثم قمت بإخفاء الأسلاك الخارجة بتمريرها خلال الأنبوب المجوف
إن
الألواح الشمسية ستكون بحاجة إلى آلية تقوم بتحريكها، لكي تكون قادرة على
تعقب حركة الشمس، هذه الآلية يمكن أن نحصل عليها عن طريق 4 مساند بشكل حرف
L، ومحرك سيرفو مكابح ميكروي، ومسننات من نوع كقطع. بهذه الأدوات نستطيع الحصول على وحدة أو نظام التدوير للوحات الشمسية كي تقوم بتعقب حركة الشمس.
قمت
بصنع المساند من ألواح المنيوم مسطحة بعرض 2 سنتمتر، ثم قمت بقصها في
المنتصف، ثم ثنيها عن طريق ملزمة أو كماشة، وفتح ثقوب في الطرفين إحداها من
أجل تمرير أنبوب اللوحة الشمسية والآخر من أجل تثبيت المسند على اللوحة
الإلكترونية. أما المسندين الذين استعملتهم لتثبيت محرك السيرفو فقد اضطررت إلى تقليل
عرضهم كي أكون قادرا على تثبيت المحرك، وحسب طريقة تركيبك للمساند، قد
تحتاج إلى شقوق أخرى لتمرير أسلاك معينة، تستطيع أن تفعل ذلك لكن بشرط أن
لا يؤثر على التصميم.
تستطيع
أن تأتي بالمسننات من أي لعبة أطفال قديمة، بحيث تكون مناسبة لتركيب
الأنبوب المجوف الخارج من اللوحة الشمسية، وعن طريق الصمغ والمواد اللاصقة تستطيع أن تقوم بتثبيتهم معا، واستعمال المواد اللاصقة هنا كي تكون قادرا على الفك في حال تطلب ذلك.
خذ المسنن الذي أتيت به وقم بتثبيته بمحرك السيرفو، ثم قم بتجميع كامل القطع كما هو مبين في الأشكال المرفقة
ن
تركيب الكاميرا كان الجزء الأسهل من التصميم، فقد قمت بشراء كاميرا
لاسلكية (سعرها لا يتجاوز 30 دولار أي بحوالي 254 درهما مغربيا، و 192
جنيها مصريا، و 112 ريالا سعوديا)، وبكل بساطة قمت بفك العدسة، ثم قمت
بإدخالها للثقب المخصص لها في الهيكل الخارجي ثم قمت بتركبيها مرة أخرى
داخل الكاميرا، ثم ثبتت الكاميرا بالهيكل عن طريق المادة اللاصقة
الحرارية، وحرصت أن يكون التثبيت بالمادة اللاصقة الحرارية كي أكون قادرا
على إزالتها إذا تطلب الأمر، ثم قمت بتثبيت البطارية ذات ال 9 فولط خلال
نفس العملية. أما تشغيل الكاميرا (مقابل 2.0) سيكون أما عن طريق مؤقت زمني أو عن طريق جهاز تحكم
و لكي أكون قادرا على إعادة البرمجة للنظام، وجدت أن المقبس المستعمل
لتركيب ماوس الكمبيوتر مناسبا جدا، حيث له دبابيس كافية لتقوم بالعمل،
وبقطع الكابل إلى نصفين أعطاني نهايتين (ذكر وأنثى) بأسلاك جاهزة لعملية
اللحام
والآن
سنأتي إلى الجزء الأصعب من العملية، وهو الدماغ، حيث ترى في الصورة عدد
القطع الإلكترونية المركبة، كل هذه القطع الإلكترونية قمت بالحصول عليها من
أدوات إلكترونية قديمة. ومن الصعوبة بمكان شرح كيفية وضع كل قطعة بمكانها، لكني استعملت المعالج
PICAXE 14M كي يمثل دور العقل في النظام، والصور المرفقة تشرح بعض الشيء،
بالإضافة إلى المخطط المرسوم في الصورة التالية سيساعدك كثيرا على تركيب
القطع، ولكي تقرأ المخطط بشكل جيد بالإضافة إلى برمجة المعالج PICAXE
قد
تتساءل ما الذي سيحدث داخل الجهاز بعد كل هذا العمل، لذا دعني أشرح لك،
عندما تدخل الطاقة إلى النظام يقوم أولا بفحص الفولطية الداخلة والتي تأتي
من الألواح الشمسية، إذا كانت الفولطية منخفضة، يصبح الجهاز في حالة سبات،
وإذا كانت عالية يستيقظ (يعمل )، وعندما يستيقظ يصدر الصوت عن طريق مكبر الصوت، كما يقوم الصمام المشع
للضوء بالإضاءة كالصاروخ، كي يشبه الجهاز بالقمر الصناعي الطبيعي.
بعد
ذلك تقوم اللوحات الشمسية بمسح 5 بقع في السماء، وتقيس الفولطية في كل
عملية مسح، وعندما ينتهي من عملية المسح يقوم بمقارنة البقع، ويختار البقعة
ذات الفولطية الأعلى، وتدور الألواح مرة أخرى لتثبت على باتجاه البقعة ذات
الفولطية الأعلى وتصبح في حالة سبات لفترة قصيرة من الوقت كي توفر الطاقة، وبعد أن تستيقظ تقوم بفحص فولطيتها الأساسية وتبدأ
بنفس العملية مرة أخرى، وإذا كانت الفولطية منخفضة جدا تقوم بإصدار الصوت
عبر مكبر الصوت، ثم تذهب في سبات عميق
كل ما ستقوم به الآن هو تجميع القطع بالكامل، كما في مجموعة الصور. بالنسبة لتصميمي كنت قادرا على تركيب كامل القطع داخل الهيكل الخارجي، ثم تركت ثقبين من أجل تمرير أنبوبي اللوحين الشمسين. ثم
أنني كنت قادرا على تحريك اللوحين الإلكترونين للأعلى
وللأسفل، وذلك لأنني
استعملت براغي مقلوظة من الطرفين، وكانت هذه فكرة جيدة من أجل التحكم
بالبعد بين الألواح الإلكترونية
¿Cómo hacer un satélite sencilla en su casa
Los beneficios de pequeño satélite en su casa donde usted puede poner
cámaras de vigilancia para el hogar de más de 300 pies - y poner paneles
solares podrían alimentar el mismo cargo por el sol directamente
Herramientas utilizadas
Cubra externa y se puede acceder desde una vieja lámpara o un viejo
pantallas de lámparas y por favor hacer pequeños agujeros para poner
cámaras
Hacer lanzamiento del transbordador él ha hecho, que será entregado en
la iluminación del satélite y puede trabajar en este caso para utilizar
cualquier cubierta del tubo de crema como se muestra fotos
Y Cortar la pieza superior para que sea similar a la lanzadera
Y esta pieza está instalada en el segmento inferior de la lámpara
A continuación, corte un pedazo de pintura electrónica en un
movimiento circular como imágenes para que sean adecuados para ser
colocado en el interior del segmento superior
Y está conectado a la válvula de la luz radiante del panel
electrónico, dejando suficiente longitud de cable conectado a la válvula
con el fin de ser conectada al circuito eléctrico más tarde
Y el panel electrónico se instala en la parte superior de la
lanzadera, y la lanzadera está instalada inferior profesional
independiente de la lámpara
Entonces, después de instalar la adición de un sonido del altavoz
pequeña de una vieja radio, por ejemplo, la sección superior de la pieza
de la lámpara Filah como imágenes
Luego viene el papel de las células solares
Vamos a necesitar a la estructura de clases, recogiendo los circuitos eléctricos y paneles solares. Así que encontré la mejor manera de arreglar eso puse pinturas electrónicos en capas, como en las imágenes, que son proceso barato y fácil y no requieren mucho tiempo, ya que le permite volver a Qmrk fácil mantenimiento industrial. Imágenes anteriores muestran dos vistas en la obra del templo embarazada
Usé 4 pilas recargables con una capacidad de 2000 NiMH (con la excepción de la batería de 9 voltios utilizados para la cámara). Para que estas baterías permanecerá siempre cargadas, utiliza Hmsien dos hojas de paneles solares que se utilizan en jardines lámparas de iluminación, has quitar los paneles solares de los bulbos, entonces hacer una plantilla para darles la forma adecuada y limpia, y luego ocultar el alambre extra que pasa por el tubo hueco
La
instalación de la cámara fue la parte más fácil del diseño, tiene usted
compró una cámara inalámbrica (el precio no exceda de $ 30, o alrededor
de dirhams marroquíes 254 y 192 libras, y 112 SAR), y simplemente
descomprimir el objetivo, entonces usted ha entrado atribuida en el
exoesqueleto y luego vez que Petrkbhe del agujero Otros
dentro de la cámara, y luego establecer la estructura de la cámara a
través del adhesivo térmico, y tenía muchas ganas de estar con la
instalación térmica adhesiva para poder eliminarlos si es necesario,
luego de haber instalado la batería de 9 voltios a través del mismo
proceso. El funcionamiento de la cámara (Vs 2.0) será ya sea temporal por el tiempo o por control remoto
Con el fin de ser capaz de volver a la programación del sistema, y
se encontró que la toma de usuario para la instalación de un ratón de
ordenador es muy apropiado, ya que bastantes alfileres para hacer el
trabajo, y cortar el cable en dos mitades me dieron dos extremos cables
listos para el proceso de soldadura (hombres y mujeres)
Y
ahora vamos a llegar a la parte más difícil del proceso, que es el
cerebro, donde se ve en el número de imagen de los componentes
electrónicos del vehículo, todas estas piezas electrónicas que las
reciba de la Electrónica de Consumo de edad. Es difícil de explicar cómo poner cada pieza su lugar, pero he usado
el asistente Picaxe 14M para representar el papel de la mente en el
sistema, y las imágenes que se adjuntan a explicar un poco, además del
decreto en el siguiente esquema de imagen le ayudará mucho en la
instalación de las piezas, y esbozar leer bien, además del procesador
PICAXE programación
Usted
puede preguntarse qué va a pasar dentro de la máquina, después de todo
este trabajo, así que vamos a explicar a usted, cuando la energía entra
en el sistema es primero comprueba la entrada de tensión que proviene de
paneles solares, si la baja tensión, el dispositivo se convierte en un
estado latente, y si el alta se despierta (obras ), y cuando se despierta el sonido emitido por el altavoz, como la luz
irradiada iluminación como un cohete LED, por lo que la máquina se
parece a un satélite natural.
Después
de que los paneles solares escanea 5 puntos en el cielo, y medir el
voltaje en cada exploración, y al final del proceso de análisis compara
manchas, y elija el lugar con una tensión más alta, paneles de girar de
nuevo para demostrar a la dirección de la mancha con una tensión de
hasta nominal y se convierten en coma durante un corto período de tiempo para ahorrar energía, y después de despertarse está examinando
su núcleo de tensión e iniciar el mismo proceso de nuevo, y si la
tensión es demasiado baja cuestión una voz por el altavoz, y luego ir
latentes
Todo lo que estaría haciendo ahora es para ensamblar las piezas en su totalidad, como en las fotos de grupo. Para
mi diseño yo era capaz de cortar toda la instalación dentro del
exoesqueleto, entonces dejé dos agujeros para poder pasar las tabletas
Achammsin tubular. Entonces
yo era capaz de mover los profesionales de mesas para computadoras de
arriba abajo, porque yo solía tornillos roscados de ambos lados, y esta
fue una buena idea de la dimensión entre los paneles de control
electrónico
ليست هناك تعليقات:
إرسال تعليق